Director Tutorial

Introduction

This tutorial is dedicated to give you some basic knowledge about Director movies. Second chapter describes the basic concepts in Director. The Tools chapter gives you some more info about the program tools for creating interactivity. Then the movie chapter comes to lead you step by step through the process of creating the sample movie, shown at it's begining. The last chapter describes how a Director movie can be distributed - locally or on Internet.

Basic concepts

Cast
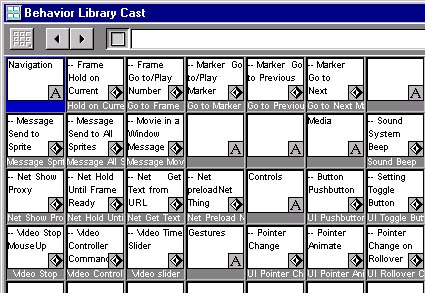
Cast is a library of all elements, used in a Director movie. The cast window (Fig.1) shows these elements.
There are internal and external casts. Internal casts are stored inside the movie file and external casts are stored in separated files. External casts are used for often used cast members as buttons for example. Directors libraries (in Xtras menu) are external casts.

Fig.1 Cast window

Cast members
The elements of a cast are called cast members. They include text, sounds, bitmap images, digital videos etc. Some of the cast members are media elements, made with another program and imported into the movie, others are made with Director tools.
To import a media element from outside, you must choose File/Import and then specify the location of this element. This is the way to import pictures, audio and digital video. (When the digital video is Quick Time movie, however, it matters which version of Quick Time you have. If it’s 3.0, then you must not import the file through File/Import, but insert it through Insert/Media Element/Digital video) . When you import a file from outside, you can choose between two possibilities - to import the file as it is in the movie, or to keep in the movie only a link to the file.
You can create text, bitmaps, color palettes, sounds and buttons with Insert/Media element menu. When you choose a menu item from this menu, a cast member is created and the appropriate window for editing it is opened. For example, if you choose to insert text element, a Text window opens, to give you the opportunity of editing text. You can also create simple shapes cast members with the tool palette(Fig.2).
When you want to make a cast member part of your movie, you drag and drop it to the stage or the score. That means you create a sprite.

Fig.2 Toolpalette

Sprite
Sprite is an object, that determines how and when a cast member appears in the movie. You may use one cast member to create more than one sprites. You can resize a sprite, change its position on the stage, apply ink effects to it, change its duration, and more and this will not effect on the cast member, represented by this sprite. To resize a sprite drag it’s ends on the stage, or specify it’s coordinates in the upper right corner of the score (Fig.3). You can view/change sprite properties either in Modify/Sprite menu, or in the popup menu, showing when you point the sprite and click the right mouse button.
Fig.3 The upper right part of the score


Stage
Stage is the place, where you can play the movie and see what it looks like in any moment of its creation. Stage shows the effects you’ve achieved by working with the score. A lot of actions can be performed directly on the stage – for example resizing or changing position of a sprite. Stage properties can be viewed and changed in Modify/Movie/Properties.

Score
The score is the place, where you actually direct the stage. There are 54 channels in the score, first 6 of them are meant for special effects, and the others are destined for the sprites. Score is also divided into frames. You see the number of a frame above it. The movie you see on the stage is just a sequence of frames, shown consecutively. A playback head moves through the frames, while the movie is playing, to show which frame is currently active. You can edit either the entire sprite, or its frames. The choice can be made from Edit menu or from the popup menu, that appears when the sprite is selected and mouse right button is clicked. You can assign markers to some frames, to find them easier later, instead of always remembering their numbers. To create a marker for a frame, you have to click in the marker channel, and enter some name for the new marker. You can move a marker to another frame (or remove it), by dragging it to the chosen frame (or out of the score). All created markers can be seen either in the score or in the markers window, available trough Window/Markers. In the sample movie, described in the forth chapter, markers are set to all first frames for the "pages" you go through.

Director Tools

Libraries
Director offers some external casts, called libraries, for most common used cast members. The behavior library cast (Fig.4) contains behaviors, that are very useful, when you need to register, when an event has occurred, and make something in response. For example, if you want to move the playback head to frame #5, when you click on a button, all you have to do is:
  1. set go to frame behavior to the button by drag and drop;
  2. fill number 5 in the destination frame field in the window that shows;
  3. choose mouseUp as an inicializing event;
  4. Choose Go to as a play mode;
Another library, that can be very useful is the button library (Fig.5). A great number of buttons can be found there.


Fig.4 Behavior library


Windows
We have already described the main director windows : Cast and Score. There are much more windows here, that are provided for creating or editing cast members. There are : Text window – for text cast members; Field window – for text fields; Paint window – for bitmaps; Color palette window – for color palettes; Marker window – for markers; Tool palette - for drawing shapes. You also have a Control Panel, which shows the current frame, its duration and the chosen tempo. It also can be used to play, stop, rewind the movie.

The movie


Global view
This Director movie leads you through some pages, dedicated to the animals. You move from page to page by clicking on the next/previous button in the bottom right corner. Here is how it happens: You already know, that when the playback head moves through a frame in the score, all the sprites, included in this frame, become visible on the stage. This consequence of "scenes" on the stage makes the Director movie. If you don't stop it somehow, the playback head will go through the movie on and on again, from the first to the last frame without pausing anywhere. This is not always very acceptable, for example if you are interested in what is written about the flamingo, because the text will disappear immediately after it appears. So, what you have to do, is to specify where the playback head should stop, and then continue if necessary. This is made with the hold on current frame behavior. If you set this behavior to a frame in the score, when you start the movie, it will display all frames before this one and when it reach it, it will display it and stop. So this frame will stay visible, until another event occurs, and changes the playback head position. For example, if a go to frame N behavior is set to some image or button, included in this frame, then clicking on this image/button will place the playback head at frame N, and the movie will continue from there.

First movie page
What you see here, is a sequence of letters, appearing one by one, and making a welcome phrase. How all this happen:
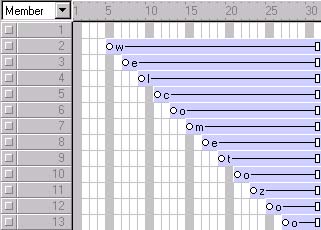
Every letter is a bitmap image, imported through File/Import and thus become a cast member. To make it part of the movie, you have to drag it to the stage or to the score. You can position this image wherever you want on the stage by drag and drop. Next thing to do is to determine how long this image will stay visible. In order to make letters appear one by one, you have to set them different number of frames, in which to appear. This is made in the score. There you find the sprite, which is responsible for visualization of the chosen cast member (the bitmap image of the chose letter), and change it's start and end frame, by pulling it's left or right end to the wanted frame number. So, if you set the duration the way it is shown on fig.6 the letters will appear one by one, just like they do in the sample movie. The last frame for the first page has a hold on current frame behavior set, in order to give you the opportunity to choose if you like to continue or not. This is easy to do: open a Behavior Library from xtras menu, find the hold on current frame behavior and drag it to cell where the last channel from special score channels and the frame intercept. When you drop it there and start the movie, you will see, that when the whole phrase "Welcome to Zoo" is written and the next button appears, the movie will stop there. To make it continue, another behavior must be included. In this movie, it is made by go to Next Marker behavior, set to the next button. When you choose this behavior and drag it to a sprite, you must specify the inicialization event (Fig.7). Mouse up event is exactly what you need there. When you set the behavior to the sprite, and start the movie, you will be able to leave the first page and go to the next one, by clicking on the next button. Something more, this button is used for all "pages" in the movie. It's duration is extended in the score, to last from the last frame of the first page to the last frame of the page before last.


Fig.6 Letters duration

Fig.7 Dialog window for specifying behavior parameters


Second page
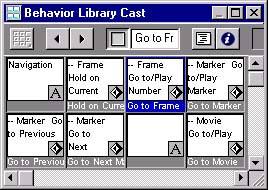
Here you will find another set of bitmap images, and some text above them. When you click on an image, a page, dedicated to this animal, opens. This is made possible through behaviors, described in the previous chapter(Fig.8). There are several behaviors, that move the playback head to another frame. If you use the go to frame behavior, you must enter the number of the frame, where you wish to go. This is not very good idea here, because if someday you deside to insert another animal before the elephant for example, you will not only have to move sprites from and after the elephant page, but also change the behavior, set to the elephant picture, to point to the new frame number. The better way to rich this functionality is to use the go to marker behavior. You must have some markers first, so let this be the last thing you will do in the movie. When you make the pages, dedicated to the different animals, insert marker(as described in the previous chapter) for the first frame of every page. Then, when you have all starting frames markered, you can go back to this page and set the go to marker behavior to every picture. The dialog window will appear, where you must choose the marker for the corresponding animal and an inicialization event. The latter is again mouse up.


Fig.8 Behavior Library Cast


Leopard page
Besides the animal picture, you see three buttons. Clicking on any of them changes the text above. How this happens:
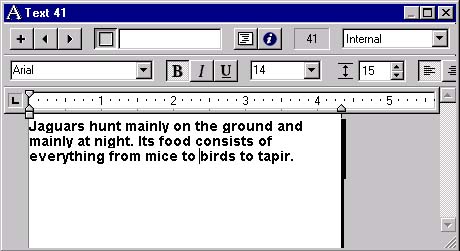
First you need some buttons. You may create them in several ways. They can be buttons, made with the help of the toolbar , or another bitmap images, painted in another program and imported through File/Import. They also can be simple toolbar rectangles. When they are painted in another program, you may put the text in them, using the same program. If the situation is different, you will need the text window (Fig.9) . When you write there what you want, for example "basic info", this becomes a new cast member. To make it appear exactly upon the button, you must first include it in the movie and then drag it to the proper place. Also, you must check if both - the button and the text, appear in the same frames. This won't be needed if you use the toolbar button and write in it. In the sample movie there are both kind of buttons. The rectangle text area above the leopard is a bitmap image again. The cast members, displaying different text in it, are made in text window, just like the text on the buttons. When you click on a button, the appropriate text comes to take the place of the previous one. It's not the text only, what changes. In fact, when you click on the button, you move the playback head to another frame, where the leopard picture, the buttons and the rectangle above still are visible, but the old text cast member is not, and the new one appears on its place.


Fig.9 Text window


Elephant page
The picture and the first two buttons work as described in the leopard page description. The only difference is that here you have a new media inserted - clicking on the button "Hear them" will start audio file playing and you can hear the elephants. The audio is inserted in the score the same way the other cast members are, but it is inserted in the music channel instead of standard channels. The hear them button (which in fact is a bitmap image), has a go to frame behavior set, and it's set even twice, because of the two text components, relevant to the other buttons. You are able to read both texts with or without listening to the elephants. That's why there are two sprites for the sound. When opened, the elephant page shows the basic info about the elephants, and doesn't play sound. This is because the first frame of this page doesn't contain the sound sprite. Then, a hold on current frame behavior stops the playback head at the last of these frames.
The next five frames contain both the basic info text and the sound sprite, but you can go there only if you click on the hear them button, because of it's go to frame behavior, which has the first frame of the sound sprite specified. If you click on the more info button, you will skip some frames, and go to the frame 66, where you have the other text component, which replace the first one. But you still can hear the elephant by clicking on the appropriate button, because this is another button (made from the same cast member) and it has another go to frame behavior set, which moves the playback head to another frame, where another sound sprite(just the same as the previous one) is placed.
So, next button is here again, to show you the next page.

Flamingo page
It's the simplest page in the movie. You have one imported gif image, some text created in Director Text window and a button made with the Tool palette. It's a pushbutton, which has two behaviors added - Go to frame and Sound Play File. The go to frame is needed, because the sound file sprite starts at frame 81, but frame 80 has a hold on current frame behavior set, so the sound file can't start playing before the playback head reaches its first frame. With a hold on current frame behavior set on frame 80, you don't hear the sound, unless you click on the hear them button. Sound Play File behavior means exactly what it says - it plays the file.

Crocodile page
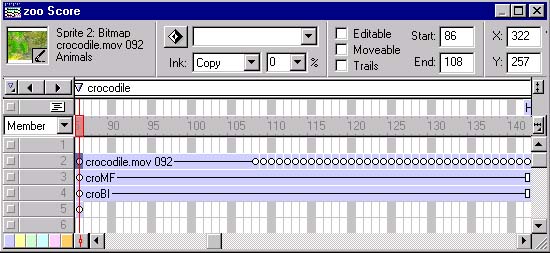
This page shows a short animation, made from a consequence of frames. While the sprites for the text cast member above the movie, and beyond it, have a long lasting duration, making them show in all frames of the crocodile page, it's not the same with the crocodile pictures. Every one of them, except the first one, is set to last only a frame. There are several consecutive frames, where these sprites are situated (Fig.10). All of the participating sprites have equal sizes, and appear at one and the same place on the stage. When the playback head is moving through the frames, these pictures appear one by one, and make a consequence of scenes, which looks like a movie with a moving crocodile.


Fig. 10 Crocodile page configuration


Jaguar page
What you see here are four pictures, moving from the four corners of the stage to the center, where they gather together to make a whole picture, and then this picture moves to the upper left corner to stay there, while some interesting info shows, and a little bit after it a movie appears. The motion of jaguar's picture parts is made with inserting keyframes. You can insert keyframes from the Insert/Keyframe menu, or with the help of the popup menu, which appears, when you click with the right mouse button on a frame of a sprite. You can also reach such an effect by dragging the picture through the stage, but the cursor must be position at its center first.For the first jaguar frame, a keyframe is not needed, because the first frame of a sprite's frames is always considered to be a keyframe. So, for the first frame, the four pictures are situated in a usual way, in the four stage corners. Then, the duration of these pictures is determined by dragging the sprites' ends in the score to the chosen frame. In the example movie, the sprites are extended to frame 214, which has a hold on current frame behavior attached. Then for every picture the next steps are made:
  1. A frame 160 is chosen in the appropriate sprite;
  2. This frame is set to be a keyframe by choosing Insert/Keyframe menu;
  3. The picture is placed on such a position on the stage, where together with the other pictures will make a jaguar image in the stage center.
(The same three steps are made for frame 161, to make the whole image move lightly). Then the frame 214 is made a keyframe, and all four pictures are moved together to the top left corner. Moving some sprites together is possible, if you select all of them and then drag the selection. How the text cast members are created, and inserted in the movie, you already know. Some frames after all the text have appeared, a new sprite comes onto the stage - the sprite for an arrow cast member, which points to the place, where a movie will appear. This movie differs from the previous one only because here you have controller shown. You can specify if the controller will be shown or not in the cast member properties window, which can be chosen from the popup menu, that appears when you click with the right mouse button on the movie cast member in the corresponding cast. There you have a button options, that opens another window, where a property is provided for controller.

Last Page
You don't need explanation about it, do you?

Distribution

Distributing movies source code is not a good idea, because anyone who has the Director will be able of editing them. There are some other possibilities for distributing movies : as projectors, protected movie or Shockwave movies.

Projectors
Projector is an application, that plays the movie, but doesn’t allow its editing, because it doesn’t contain the software, required for editing. You can use projectors to distribute movies on disk, or to play the other types of movies – protected movies and Shockwave movies, for they don’t even include the software for playing movies inside them. You can create projector, if you choose File/Create Projector. A window appears, where you can specify which movies, xtras, external casts and linked media will be included in the projector. Then you choose the options button to specify the projector options. These options include: the operating system properties, the way the movie will be displayed, whether the media should be compressed (with a Shockwave compression) and if some xtras should be included.

Protected movies
Protected movies are also used for distributing movies on the disk, and they load faster than projectors, because they are not compressed. But they need projector to play them, because they don’t even include the software for playing the movie. Protected movies are good idea, when the disk space is unlimited.

Shockwave movies
Shockwave movies, just like protected movies, don’t contain the software required to play a movie. They need either a projector or a Shockwave player installed, to play in a web browser. Shockwave movies are used mostly for distribution on Internet, but they are also useful when a movie that is not in projector, needs to be compressed.
Shockwave movies for Director movies can be played in Netscape Navigator – version 2.0 or later, and Microsoft Internet Explorer – version 3.0 or later. They also can be played in browsers, compatible with the plug-in architecture of Netscape Navigator 3.0.
Shockwave movie contains movie’s data compressed. When someone opens a web page with a shockwave movie in it, Shockwave starts decompressing the data, when it arrives, and then it plays the movie. There are three possible ways of playing such a movie, and you may specify the one you want in Modify\Movie\Playback . The Wait For All Media option means that the movie will start playing in browser after all its has been downloaded. Use Media as Available is the most common used option for streaming movies. It means that the cast members appear in the movie as soon as they’ve been downloaded. Unavailable cast members just don’t appear until they completely download. Another option for streaming is Show Placeholders. It means that a placeholders will be shown for the media, that is not available yet. For streaming movies there is one more option to be set. In the Pre-Fetch box you must type the number of frames, you want to be available before the movie starts playing. If you type there 10 for example, the movie will start playing after all cast members, used in first 10 frames. Are downloaded.

All xtras, used to import the media for linked cast members in the movie, must be available when it runs. If you are not sure what xtras are needed from your movie, you can see them in Modify\Movie\Xtras. Projectors include needed xtras automatically if the Check Movie For Xtras option is checked in the dialog box for the projector options. Shockwave players for Netscape Navigator and Microsoft Internet Explorer include xtras for some types of media like gif and jpeg graphics and some audio files. For the rest type of media the proper xtras must first be downloaded and installed.

Back to lecture notes